Saturday, December 24, 2011

Happy Holidays to everyone!


I hope your holiday season is turning out to be a very good one for everyone of you.  May you celebrate the new year with lots of ideas for tapestry making and many happy hours seeing those ideas grow on your looms.

Speaking of looms, here's a link to a posting on my web site about setting up my large 60" loom.  This is the method I usually use for warping my upright tapestry looms.  The warp that was being done in the photos has been woven off now.  It turned into the tapestry called Leaf Dance that I finished in 2010.


Leaf Dance, 54" x 53", wool and cotton

Here's my little studio Christmas tree, by the way.  The teeny lights decorating the tree were sold at our local hardware store as "Flashing Holiday Necklace"--but I thought they'd be perfect for my little Norfolk Island Pine that lives at my studio.  Although you can't really see them, there are also three vintage glass ornaments on the tree that came from my grandmother's home.  They're fragile and quite special so I only pull them out occasionally.  I thought I'd enjoy them here this year.


So... have a happy and safe rest of the year!  Celebrate tapestry whenever and wherever you can!

Friday, November 25, 2011

Happy Thanksgiving--and an addition to Tapestry Share

Hello all,
I hope your Thanksgiving was great and that you're well energized for a good winter of tapestry making!  I thought I'd do an addition to the blog's first page so that a few of the posts that might be particularly useful can be easily found.  If you look in the left margin under the Search box you'll find the heading Jump to Helpful Hints Here at Tapestry Share with a few links below that.  I'll add blog posting links to this in the future as things come up.

See what you think!

Saturday, November 19, 2011

Little tapestry started at Folkschool

This is a small tapestry about 3 inches wide, in-progress, on a 1/2 inch Archie copper pipe loom. I began weaving this while taking Tommye's tapestry design class at John Campbell Folk School in January.

I began by using a cartoon that I traced from some brushstrokes of paint on paper that we used in our creative exercises in the workshop. I was intrigued by the colors coming through and fading out against the background paper. I chose the colors from the weft yarns I had brought to the workshop.

As I got further into weaving the piece, I set the cartoon aside and allowed the colors and wefts to do the talking. This intuitive way of choosing color and blends has been very freeing and fun, but at one point, I got stuck and didn't know where to go with it.  I met up to weave with Joan Griffin in October and she suggested that I begin to fade out the colors to paler ones as I progress and that's what I've been doing here.


Friday, November 18, 2011

Mounting/finishing method for small tapestries

I'm preparing for an exhibit soon and have lots of small tapestries that I'm getting ready to hang.  I thought I'd share some of the process here.  There's a good collection of articles about hanging methods for tapestry included at the American Tapestry Alliance website at this link.  The method I was using a few years ago was the one I described at the ATA site and it's just a bit different than what I'm showing here.  But... there you go... always looking for a different way... if not better!  So here are my steps:

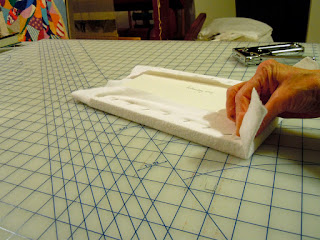
For the mounting board I've used 1/2" foam core board.  It works fine for small pieces; the largest one in this group is 41" long x 4" wide.  I measured and cut the mounting board using a fresh blade in the utility knife.  A cutting mat is quite helpful for this process as is a metal yard stick.


Next, I stretched a layer of cotton flannel (prewashed/dried) over the board using 3/8" staples.  I clipped the ends and trimmed excess cloth away.


The mounting fabric in this instance is a natural color of cotton twill canvas.  It was also washed, dried and this fabric was steam pressed (no need to press the flannel since it smooths out when stretching and stapling it.)


Excess fabric was clipped out of the corners, then the edges folded over and stapled at the back.  This step is a bit tricky--you want to pull the corners as tightly and smoothly as possible.  Staple and then you're ready to stitch on the tapestry.


The tapestry is laid onto the mounting board and pinned in place temporarily with t-pins.  The mounting boards are about 1/4" to 1/2" larger than the tapestry so there's a small margin showing around the edges of the weavings.

Before mounting, the ends of the warps are dealt with... for small pieces that aren't four-selvedge woven (which leaves no loose warps to deal with), I usually use a half-Damascus edge that Peter Collingwood describes in his book, The Techniques of Rug Weaving.  It's shown on pages 484-486.  The process is done with the face of the tapestry down and it makes the warp ends lay against the back/body of the tapestry.  Then I whip-stitch the warp ends down, four to six grouped together.  And wefts that are near the edges are also tucked to the back with a whip stitch.


Using a curved needle, the tapestry is stitched to the mounting fabric, moving around the edges.  A color of sewing thread that will blend with the edge colors as well as possible is what was used, although I changed color of stitching thread if the value contrast of the weft at the edges was great.  On the pieces with the warp showing at the edge, the stitching color was changed to the warp color (usually natural color).

The curved needle will slip into the mounting fabric, travel up about 1/4" and then come out between the first and second warp.  Pull the needle out, bury the sewing thread between wefts, then put the needle across to the mounting fabric again where you'll take another stitch under the fabric to the next point of attachment to the tapestry.


This is a curved needle... although looks straight here.
The back of the mounting board was covered with a piece of illustration board (mat board will work also) that was glued down.  To glue it in place, the illustration board was quickly painted with slightly diluted craft glue, brushing it over the entire board and immediately laying the board on the back of the mounting board/tapestry. You need to be prepared to weight the whole thing down immediately--have wax paper torn to sightly larger size than the board (this is a barrier to keep any bits of glue from your weight) and put the wax paper on top of the whole thing.  Weigh it down with something heavy (I use books).  Leave it all alone overnight and when you uncover it the next day, all should be fine.


For hanging, there are several solutions... you can use an adhesive hanging system, sawtooth hangers, or velcro.  I was able to locate enough push pin sawtooth hangers to use for the tapestry diary pieces at the local hardware.  This is an easy method to use and should stay in place just fine.


The mounting board may also be put into a shadowbox-like frame.  That's what I'm going to do with several of the smallest tapestries--frames will have to be built to size by a local craftsman in this case since I haven't been able to find shadowbox frames as small as I need.

And... here are the framed pieces... Jeff just delivered the frames a short while ago.  They're exactly what I wanted for these pieces.

Saturday, November 12, 2011

A few photos from the Sutherland Studio workshop

Rita sent these photos... more to come soon.  It's hard to believe a week has passed since we were all hard at work in Asheville!

Pat winds a bobbin

I'm photographing Rita as she shoots in return!

Liese chats with Pat while Hardy is concentrating on his shaped tapestry

Cindy and Barb

Betsy and Tommye

Diane's lovely smile

And Liese's smiling face.

Sunday, November 6, 2011

Wonderful workshop at Sutherland Handweaving Studio

I'll post photos soon... but a quick update to say the two 1/2 day workshop went well and that everyone had a good time.

Sunday, October 23, 2011

Photos from Recent Four Selvedge Workshop

We had a wonderful group who met yesterday at my studio for the four selvedge workshop that Pat Williams and I were presenting.  There were five of us squeezed into my small studio house but we all fit into our own places just fine.  Six were enrolled but one person, unfortunately, had a death in the family and wasn't able to join us.

Pat and I have both worked with four selvedge method of set up for tapestry weaving for several months now.  We've both learned the process through watching Susan Maffei's demonstration on the DVD, Woven Tapestry Techniques, and also by reading her articles about the method on the Brennan-Maffei website.

I spent a day with Pat earlier in the week so that we could do final preparations for the workshop... these first few photos are about that:

Pat's worktable with some of our examples laid out

Pat completes a four selvedge piece (the black warp is the supplemental warp, not the tapestry warp).
Pat's pulling out the supplemental warp remains from the small tapestry...

... and she's using Susan's alternative finish method to end the piece.
Next, are a few photos from the workshop.  The day began with a demonstration of the process, then each person worked with their own loom to set up a 1" wide sample, at 6 ends per inch.  The height of the piece was up to them but we suggested that they make it 4 or 5" tall.

Gail and Ann Lynn set up their looms
Everyone wanted to be together to work, so once the looms were set up we all squeezed into my front room for doing the weaving of the sample.

Rosemary and Gail 

L to R: Ann Lynn, Sidsel, Genie, Gail, Rosemary

L to R: Ann Lynn, Pat, Gail (Rosemary behind Gail)

L to R:  Ann Lynn, Pat, Rosemary, Gail, Sidsel, Genie

Sidsel and Rosemary
The first piece was completed before noon and we had a quick sandwich from a local shop.  After our lunch break everyone took off the first sample and rewarp the loom.  Eight ends per inch was the next challenge everyone tried and some warped a bit wider.  Almost everyone was able to rewarp to take home for completion and one finished a second 1" wide piece before the end of the workshop at 5 p.m.

Pat and I hope everyone will be able to now continue to use this method.  It's a wonderful way to eliminate the warp ends on small pieces.  And, just like any skill, the ease with which one uses it develops through practice (practice, practice, practice...!)

And, Pat and I are considering another one day workshop together, possibly in about six months, to be held next at Pat's studio.  We'll announce details of schedule and cost in the future--but if anyone's interested, please let us know.  That will help us with planning.

Our next confirmed teaching date is coming up in less than two weeks, a two day and one evening class at Sutherland Handweaving Studio in Asheville, NC.  The class is filled with 15 participants and Karen Donde is collecting waiting list names.  Possibly we'll be scheduling another class at Sutherland in 2012.


Saturday, October 22, 2011

Four selvedge workshop a big success!

Photos to follow soon... !

Friday, October 21, 2011

Four Selvedge Workshop is tomorrow

Six people will be coming to Dahlonega to have a workshop with Pat Williams and me.  Pat and I have been working with four selvedge warping since early summer, using Susan Martin Maffei's instructions from the DVD and also her written notes from her website.  We're going to share what we've been learning along the way.

Here are three recent little pieces I've done as I've tried something different in each one:

This is a Spelsau warp.  I noticed the hatching I was doing seemed to suggest fingers so I did hands at the top of the piece above the pick and pick area.  EPI is about 7.5 for this.  I was trying the alternative finish that Susan suggests on her website--using crochet hook to chain through the top of the loops to end.  I didn't allow for it at the bottom so it's only used at the top on this piece.

The warp for this is 12/6 cotton seine twine in a dark blue.  I added scrap picks of twine at both ends to give allowance to chain through the loops on each side.  I continued to see where I could take the hand designs, thinking of hand gestures but not using a cartoon.  This is about 8 epi.

Again I used the chaining of the loops to finish the little piece; this warp was a yellow-green linen and the sett was about 8.5 epi.

I've done about 20 of these small pieces now; earlier in the summer I was working with landscapes.  These last ones have been simpler.  Maybe by the time I do 20 more, I'll really feel comfortable with this warping method!

Thursday, October 13, 2011

Playing around with Repper!

Many of you may already be familiar with Repper.  I've just learned about this pattern generating website through Alice Schlein's blog, Weaverly.  She's been designing with it and interpreting the designs with her TC-1 loom... fascinating!  Here's a link to one of her blog entries about it.  She's also teaching an online class through Weavolution in the use of the tool.

I played around with the free demo version a bit yesterday, using a photo of a recent tapestry for the image source.  I cropped into the tapestry and then turned the pattern generation over to Repper... here are some of the results that I saved:


Does this have potential for tapestry design??  Maybe!  I'll have to work with it a bit more to decide.  I haven't yet committed to buying the program, though... even through it's not too expensive.  Looks like it may be more for others than for me.  But I wanted to share a bit about it, anyway.  Take a look, if you want to, and decide for yourself it might become a useful designing tool for you.

Monday, October 10, 2011

John C. Campbell Folk School class in January

I wanted to mention again the class I'll be teaching at John Campbell in January. Here's the description:

Comfortable with basic tapestry methods and want to try others-maybe pick-and-pick, Soumak, weft chaining, or clasped wefts? These and other methods will be used to create a textural tapestry “doodle”, allowing you to audition them as part of your expressive tapestry style. Ability to warp and experience in tapestry is required for this intermediate to advanced class.

The Folk School website has more information: http://www.folkschool.org

Maybe I'll see so of you there! The Folk School is a wonderful place to have a class and I'm looking forward to returning.

Wednesday, September 21, 2011

Books about tapestry

Cathie Beckman recently asked a question on Weavolution about tapestry resource books.  I've catalogued most of my studio books at LibraryThing.  I've put tags on most of them, especially the tapestry ones.  Here's the link, if anyone's wanting to see what my library holds.  I can't say truly that I've read each and every one from cover to cover but have done so with many of them.

http://www.librarything.com/catalog/tmscanlin

I continue to add books when I find good ones.  I just picked up a copy of the ATA Small Tapestry International 2/Passages catalog at the current exhibit location for the show, the Cultural Arts Center of Glen Allen, Virginia.  It's an outstanding exhibit, by the way.  Thanks to Lynn Mayne for letting me know that the show was there--and it fortunately coincided with a planned trip to Richmond for my husband and me.

Monday, September 12, 2011

Four Selvedge Workshop is FULL

I've received six deposits now and that FILLS the class for October 22! Thanks, folks. Pat & I are looking forward to it.

Tommye

Thursday, August 25, 2011

Sorry about the Hambidge posting...

... I was using BlogPress to post and I didn't notice that it had Tapestry Share selected as the blog for which to post!

I'm leaving the post in place here since I've had one comment from Cathie about it. The thoughts are sharing about some of the ways I use to generate ideas for tapestry. The drawing or painting that I do is a way to discover what I want to do. Sometimes it works better than other times! Oh, by the way... if you want to see more about my time at Hambidge my blog is http://tapestry13.blogspot.com


Wednesday, August 24, 2011

Work from today at Hambidge

I had to go to Asheville, NC for a couple of meetings with committees of Southern Highland Craft Guild on Monday and stayed overnight to be at another meeting on Tuesday. So I missed a couple of days work at Hambidge... but jumped back into it today.

I called three more pieces "done" and began work on three new smaller ones. I also continued process on five more that have been underway. Here are photos of what's happening:


As I stop working on pieces I move them to another part of the room... pinning or nailing them up whereever I can. I've had to start coming down the stairs on the railing... and I've only been here a week! I guess I'll have to put them up on top of one another if I keep up at this pace... 16 pieces are either done or underway now and so far 24" x 36" is the smallest dimension.

These are in beginning stages or almost to the point of being taken down:


I did a couple of underpaintings on two of the 18" x 24" canvases today:


I'm really struggling with this one:


This one, too:


And, believe it or not... am pretty happy with this one.


This is a 36" wide x 60+" long one that's had the beginning steps... more work on this one tomorrow.


I also sat outside with watercolors and a clay board I got at True Blue Art Supply in Asheville yesterday... It's the only piece I've done so far that was from observation.

Tomorrow I'm going to do some things that will involve my drawing from observation... at least that's what I'm thinking right now! That should slow me down since it takes so much concentration to see what I'm seeing--and then to find a way to represent it. But whatever tomorrow holds will be with tomorrow.

Posted using BlogPress from my iPad

Tuesday, August 23, 2011

4-selvedge mini-class coming soon for 6 people

Pat Williams and I will be teaching a one day workshop at my studio in Dahlonega, Georgia, USA on October 22 at which we'll share what we've been learning about 4-selvedge weaving. It will be open for 6 people only (4 are now enrolled) since it will be held at my studio and there's just not room enough there for more than that there to function in a workshop kind of way!

So... 22nd of October, 9 a.m. to 5 p.m. Pat and I will both have floor stands into which a copper pipe loom or a Hagen loom can be placed for the warping process (will make it SO much easier!) Participant should bring their own frame loom which we'll help you warp for a small sample piece. The goal is to complete the small piece and to rewarp for another one before the end of the workshop day. Here's where I described my beginning journey with the process earlier in the blog: http://tapestryshare.blogspot.com/2011/06/more-on-four-selvedge-adventure.html

If you're interested please e-mail me immediately to see if there's still space available. Cost is $105, and that includes the warp you'll be using. Deposit of $50 is due immediately upon signing up--balance due on the 22nd.


Saturday, August 6, 2011

Let there be light

I got to thinking while I was weaving last month on the loom.  I see okay when the sun shines...
20110806-075621.jpg
But with all that black warp and weft yarn, a cloud can make things difficult...
20110806-075847.jpg
There could be a lamp or some track lighting above the loom, but the small LED tape was a tempting answer to putting the light right above the work.  They came from Inspired LED at http://www.inspiredled.com/.  The tape comes in a roll and is only about 1/4" wide. I just couldn't bring myself to glue the tape directly to the maple of the loom.  Then, it came to me to glue to one of the spacer sticks.
20110806-080908.jpg
20110806-081026.jpg
The final question is how is it on the loom - see for yourself!
20110806-081224.jpg20110806-081354.jpg
The coolest bonus is I can move the light between looms....
20110806-081614.jpg