Hello all,
I hope your Thanksgiving was great and that you're well energized for a good winter of tapestry making! I thought I'd do an addition to the blog's first page so that a few of the posts that might be particularly useful can be easily found. If you look in the left margin under the Search box you'll find the heading Jump to Helpful Hints Here at Tapestry Share with a few links below that. I'll add blog posting links to this in the future as things come up.
See what you think!
Friday, November 25, 2011
Saturday, November 19, 2011
Little tapestry started at Folkschool
This is a small tapestry about 3 inches wide, in-progress, on a 1/2 inch Archie copper pipe loom. I began weaving this while taking Tommye's tapestry design class at John Campbell Folk School in January.
I began by using a cartoon that I traced from some brushstrokes of paint on paper that we used in our creative exercises in the workshop. I was intrigued by the colors coming through and fading out against the background paper. I chose the colors from the weft yarns I had brought to the workshop.
As I got further into weaving the piece, I set the cartoon aside and allowed the colors and wefts to do the talking. This intuitive way of choosing color and blends has been very freeing and fun, but at one point, I got stuck and didn't know where to go with it. I met up to weave with Joan Griffin in October and she suggested that I begin to fade out the colors to paler ones as I progress and that's what I've been doing here.


As I got further into weaving the piece, I set the cartoon aside and allowed the colors and wefts to do the talking. This intuitive way of choosing color and blends has been very freeing and fun, but at one point, I got stuck and didn't know where to go with it. I met up to weave with Joan Griffin in October and she suggested that I begin to fade out the colors to paler ones as I progress and that's what I've been doing here.
Friday, November 18, 2011
Mounting/finishing method for small tapestries
I'm preparing for an exhibit soon and have lots of small tapestries that I'm getting ready to hang. I thought I'd share some of the process here. There's a good collection of articles about hanging methods for tapestry included at the American Tapestry Alliance website at this link. The method I was using a few years ago was the one I described at the ATA site and it's just a bit different than what I'm showing here. But... there you go... always looking for a different way... if not better! So here are my steps:
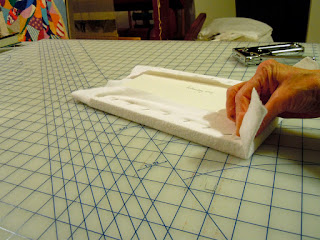
For the mounting board I've used 1/2" foam core board. It works fine for small pieces; the largest one in this group is 41" long x 4" wide. I measured and cut the mounting board using a fresh blade in the utility knife. A cutting mat is quite helpful for this process as is a metal yard stick.

Next, I stretched a layer of cotton flannel (prewashed/dried) over the board using 3/8" staples. I clipped the ends and trimmed excess cloth away.


The tapestry is laid onto the mounting board and pinned in place temporarily with t-pins. The mounting boards are about 1/4" to 1/2" larger than the tapestry so there's a small margin showing around the edges of the weavings.
Before mounting, the ends of the warps are dealt with... for small pieces that aren't four-selvedge woven (which leaves no loose warps to deal with), I usually use a half-Damascus edge that Peter Collingwood describes in his book, The Techniques of Rug Weaving. It's shown on pages 484-486. The process is done with the face of the tapestry down and it makes the warp ends lay against the back/body of the tapestry. Then I whip-stitch the warp ends down, four to six grouped together. And wefts that are near the edges are also tucked to the back with a whip stitch.

Using a curved needle, the tapestry is stitched to the mounting fabric, moving around the edges. A color of sewing thread that will blend with the edge colors as well as possible is what was used, although I changed color of stitching thread if the value contrast of the weft at the edges was great. On the pieces with the warp showing at the edge, the stitching color was changed to the warp color (usually natural color).

The curved needle will slip into the mounting fabric, travel up about 1/4" and then come out between the first and second warp. Pull the needle out, bury the sewing thread between wefts, then put the needle across to the mounting fabric again where you'll take another stitch under the fabric to the next point of attachment to the tapestry.
The back of the mounting board was covered with a piece of illustration board (mat board will work also) that was glued down. To glue it in place, the illustration board was quickly painted with slightly diluted craft glue, brushing it over the entire board and immediately laying the board on the back of the mounting board/tapestry. You need to be prepared to weight the whole thing down immediately--have wax paper torn to sightly larger size than the board (this is a barrier to keep any bits of glue from your weight) and put the wax paper on top of the whole thing. Weigh it down with something heavy (I use books). Leave it all alone overnight and when you uncover it the next day, all should be fine.

For hanging, there are several solutions... you can use an adhesive hanging system, sawtooth hangers, or velcro. I was able to locate enough push pin sawtooth hangers to use for the tapestry diary pieces at the local hardware. This is an easy method to use and should stay in place just fine.


The mounting board may also be put into a shadowbox-like frame. That's what I'm going to do with several of the smallest tapestries--frames will have to be built to size by a local craftsman in this case since I haven't been able to find shadowbox frames as small as I need.
And... here are the framed pieces... Jeff just delivered the frames a short while ago. They're exactly what I wanted for these pieces.

For the mounting board I've used 1/2" foam core board. It works fine for small pieces; the largest one in this group is 41" long x 4" wide. I measured and cut the mounting board using a fresh blade in the utility knife. A cutting mat is quite helpful for this process as is a metal yard stick.

Next, I stretched a layer of cotton flannel (prewashed/dried) over the board using 3/8" staples. I clipped the ends and trimmed excess cloth away.


The mounting fabric in this instance is a natural color of cotton twill canvas. It was also washed, dried and this fabric was steam pressed (no need to press the flannel since it smooths out when stretching and stapling it.)

Excess fabric was clipped out of the corners, then the edges folded over and stapled at the back. This step is a bit tricky--you want to pull the corners as tightly and smoothly as possible. Staple and then you're ready to stitch on the tapestry.


The tapestry is laid onto the mounting board and pinned in place temporarily with t-pins. The mounting boards are about 1/4" to 1/2" larger than the tapestry so there's a small margin showing around the edges of the weavings.
Before mounting, the ends of the warps are dealt with... for small pieces that aren't four-selvedge woven (which leaves no loose warps to deal with), I usually use a half-Damascus edge that Peter Collingwood describes in his book, The Techniques of Rug Weaving. It's shown on pages 484-486. The process is done with the face of the tapestry down and it makes the warp ends lay against the back/body of the tapestry. Then I whip-stitch the warp ends down, four to six grouped together. And wefts that are near the edges are also tucked to the back with a whip stitch.

Using a curved needle, the tapestry is stitched to the mounting fabric, moving around the edges. A color of sewing thread that will blend with the edge colors as well as possible is what was used, although I changed color of stitching thread if the value contrast of the weft at the edges was great. On the pieces with the warp showing at the edge, the stitching color was changed to the warp color (usually natural color).

The curved needle will slip into the mounting fabric, travel up about 1/4" and then come out between the first and second warp. Pull the needle out, bury the sewing thread between wefts, then put the needle across to the mounting fabric again where you'll take another stitch under the fabric to the next point of attachment to the tapestry.
 |
| This is a curved needle... although looks straight here. |

For hanging, there are several solutions... you can use an adhesive hanging system, sawtooth hangers, or velcro. I was able to locate enough push pin sawtooth hangers to use for the tapestry diary pieces at the local hardware. This is an easy method to use and should stay in place just fine.


The mounting board may also be put into a shadowbox-like frame. That's what I'm going to do with several of the smallest tapestries--frames will have to be built to size by a local craftsman in this case since I haven't been able to find shadowbox frames as small as I need.
And... here are the framed pieces... Jeff just delivered the frames a short while ago. They're exactly what I wanted for these pieces.

Saturday, November 12, 2011
A few photos from the Sutherland Studio workshop
Rita sent these photos... more to come soon. It's hard to believe a week has passed since we were all hard at work in Asheville!
 |
| Pat winds a bobbin |
 |
| I'm photographing Rita as she shoots in return! |
 |
| Liese chats with Pat while Hardy is concentrating on his shaped tapestry |
 |
| Cindy and Barb |
 |
| Betsy and Tommye |
 |
| Diane's lovely smile |
 |
| And Liese's smiling face. |
Sunday, November 6, 2011
Wonderful workshop at Sutherland Handweaving Studio
I'll post photos soon... but a quick update to say the two 1/2 day workshop went well and that everyone had a good time.
Subscribe to:
Posts (Atom)